

Thursday, September 23, 2010
Saturday, January 16, 2010
BDD for the iPhone
At Codemash this year several of my friends were exposed to iPhone development for the first time. I thought this would be a good time for me to share my experience driving iPhone application development with tests. This entry will walk you through getting xcode setup and your project linking against all of the libraries you will need to write effective tests.
With each new xcode release Apple has steadily improved support for Unit Testing. This is a good thing but it also means that the setup I will explain here is only guaranteed to work in xcode version 3.2.1. If you are using an order version you will likely need to make a few tweeks to the instructions below in order to get it working.
Adding Unit Test Support
The first thing we have to do after creating the empty project is add support for testing. The first step is to add a new build target.
There is no need to have a separate header and implementation file for our unit tests so I combine them in order to keep things as simple as possible. Select all of the code (including the import statements) from the header file and copy them to the top of the implementation file. Also, remove all of the example tests that were included by default. You can now delete the header file. In a later blog post I will show you how to change the template so it generates the test classes without these examples and in the same file. When you are finished you implementation file should look like:

The first thing we have to do after creating the empty project is add support for testing. The first step is to add a new build target.
- Right click on the Targets folder and select Add -> New Target.
- Select Unit Test Bundle for Cocoa Touch.
- I like to name this target Specs.
- This will bring up the Target Info dialog but you can just close it for now.
- Right click on the Frameworks folder and select Add -> Existing Frameworks...
- Select the Add Other... button at the bottom of the dialog.
- You should select the SenTestingKit.framework directory found under the /Developer/Library/Frameworks directory.
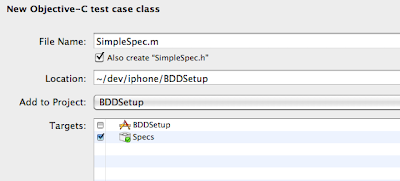
With these steps out of the way we are finally ready to create our first test class. Right click on our Specs group and select Add -> New File. Select Objective-C test case class under Cocoa Touch Class. Let’s name this first class SimpleSpec. Make sure you only add this class to our Spec target.
#import <
#import <
@interface SimpleSpec : SenTestCase {
}
@end
@implementation SimpleSpec
@end
We are now ready to write our first test method. Add the following method to your implementation:
- (void) testShouldExecuteTest {
STAssertTrue(1 + 1 == 2, nil );
}
Build the project by executing ⌘B. You will get very familiar with this key sequence. I think of this as my “run unit tests” key combination. If everything is setup correctly you should see Succeeded in the bottom right corner of the window. Let’s bring up the build result window by pressing ⍐⌘B. I usually keep this window open at all times as it gives me clearer feedback on the status of my builds.
To make absolutely sure you have everything setup correctly change the 2 to 3 in our tests and build again. You should see a failure this time.
Congratulations. Change the code back and you should see the build complete successfully. We have working Unit Tests but there is still one task remaining before we can move on.
As we develop our application we should not be building the Spec target. Instead we should be building our application target and have the Spec target build as a dependency. Luckily this is very easy to do. Right click on the application target and select Get Info. Make sure you are on the General tab and select the plus (+) button under Direct Dependencies. Add the Specs target and close the dialog. Change the build target to your application target and build again. If everything is setup correctly this build should succeed. Next change the tests so it will fail and build again. If it does fail you are ready to fix the test and move on.
Hamcrest
I have always felt that the SenTest API negatively effected the expressiveness of my tests so I was very happy to learn that Hamcrest was ported to Objective-C. I highly recommend you use this framework for all of your Objective-C testing. The library is not available as a binary so you will have to build it yourself. Check out the source from svn -> http://code.google.com/p/hamcrest/source/checkout. Once the source is checked out open the OCHamcrest.xcodeproj project file located in the hamcrest-objectivec/Source directory and build a Release version of the project. This will compile the project and create an OCHamcrest.framework directory in the hamcrest-objectivec/Source/build/Release directory.
The next step is to create a Frameworks directory in the root of your project. This should be a physical directory and not a virtual folder created via xcode. Copy the OCHamcrest.framework directory to your newly created Frameworks directory. Once this is complete add it to the project as a Framework the same way you added SenTestingKit.framework above.
Now we need to modify our Specs target to include Hamcrest. Right click on your Spec target and select Add -> New Build Phase -> New Copy Files Build Phase. Select Products Directory for the Destination and close the dialog. Drag the new build step to the top the of the build chain. Next select the OCHamcrest.framework from the Frameworks folder and drag it to the Copy Files build step. Also drag the framework to the Link Binary With Libraries build step. Your Spec target should look like this:
Now we can try to write a new test using Hamcrest. In your SimpleSpec test class write the following test method:
- (void) testShouldUseHamcrest {
assertThat(@"Apple", is(@"Apple"));
assertThat(@"Apple", isNot(@"Google"));
assertThat(@"Cheezy loves his iPhone", containsString(@"Cheezy"));
}
You will also need to add the following at the top of the file after the existing import statements:
#define HC_SHORTHAND
#import <OCHamcrest/OCHamcrest.h>
Build your project. If everything is setup correctly you should see success. I suggest you read the tutorial as it has everything you need to get started using Hamcrest. You can find it here.
OCMock
As you develop your iPhone application you will constantly have the need to mock and stub the UI framework classes. The framework for this is OCMock. The way you get it into your project is by following the same steps you used for Hamcrest. Copy the OCMock.framework folder to your Frameworks directory under your project and add it to the Frameworks virtual folder in the project.
Drag the OCMock.framework framework down to the Copy Files build step as well as the Link Binary With Libraries build step. We are now ready to try to write our first test using mocks.
In the SimpleSpec test class write the following method:
- (void) testShouldUseOCMock {
id mockString = [OCMockObject mockForClass:[NSString class]];
[[[mockString stub] andReturn:@"cheezy"] lowercaseString];
assertThat([mockString lowercaseString], is(equalTo(@"cheezy")));
}
and add the following import statement:
#import <OCMock/OCMock.h>
That is all there is to it. You can find several tutorials on the OCMock page.
Finishing Touches
There still are several simple things we can do to make our tests more expressive. First of all I do not like the assert syntax. I much prefer the language of bdd. The good news is that this is very simple to change. Add the following to the top of your SimpleSpec class:
#define ensureThat assertThat
Now we can change our verification to:
ensureThat(@"Apple", is(@"Apple"));
Also we now have a lot of statements at the beginning of our test class. I move all of them into a single header file and just include it in each file. The contents of that file are:
#define HC_SHORTHAND
#import <OCHamcrest/OCHamcrest.h>
#import <OCMock/OCMock.h>
#define ensureThat assertThat
Finally I am working on a change that will allow me to name my test methods more in line with the rspec approach. A test method could be named itShouldDoSomething instead of testShouldDoSomething. Stay tuned for further updates on this change.
I hope you found this entry helpful.
Thursday, July 9, 2009
What does taza need?
For those of you that haven’t taken a look at it I suggest you spend some time with taza. Taza is a ruby gem that provides an object oriented wrapper around web sites, pages, and flows. It provides an abstraction from the details of the pages as well as from the driver (selenium or watir) and target browser. The gem includes generators to create the shell of the desired classes. It was built for a specific purpose and serves that purpose well.
I first heard about taza from Joe O’Brien over breakfast one morning. He mentioned in passing that he was using it on a project. Since the gem was related to testing I had to take a look. At first it didn’t seem to fill a need I was having so I filed it away for later interrogation.
What do I need?
The company I work for (LeanDog) builds software and/or coaches companies hoping to learn how to become more agile or lean in there software development practices. I coach teams that develop software using J2EE and Ruby on Rails. It is not infrequent for my customers to have no test automation and often I am called upon to help setup the tools as well as train their developers and testers. As you might expect, I am very interested in automated testing.
I have standardized on using Cucumber for “acceptance testing” most web applications (both rails and J2EE) with JBehave being the exception on Java teams where they refuse to introduce Ruby. The tool works great for facilitating conversations between the customer and developers. Throughout numerous projects I have fine tuned my approach to using cucumber trying to maintain a balance between step granularity, good test design, and minimizing the need to refactor tests as the application grows and changes.
I have used both selenium and watir to drive the browser for our tests. Each gem has its’ strengths as well as weaknesses. We have learned over time that it is not a good idea to make calls to either API directly from our steps but rather to build up objects that represent our pages and encapsulate the details of the elements on the page (much like http://code.google.com/p/webdriver/wiki/PageObjects). These objects are tedious to write and once written they are bound to a driver (either selenium or watir).
In order to make things easier for me and my teams I decided I would write a new gem that would help alleviate the tedium of writing the page objects as well as isolate them from the driver. As I was working out the details of this new project I remembered taza. Taza has much of what I need but is lacking in a few areas.
Rails Support
Currently taza generates a stand-alone project from which you create your page objects and tests. If you plan to test a rails application I believe it would be more appropriate to generate taza directly into the rails application. This would require the development of a new generator. This new generator would generate the following:
These items would be generated directly into your rails application structure. Once taza is generated into your rails application it could be used by both cucumber and rspec tests. I would expect the classes that are generated inside of your rails application to be exactly the same as what is generated in a stand-alone project.
Element Generation
When you generate a page in taza you end up with a shell that looks like this:
Next the developer must edit the generated class to add all of the elements from the html page. The google search page might look like this:
I believe there are two problems with this approach. The first is that the code written is directly coupled to the driver (I address this in more detail in the next section). The second problem is that all of the additional work a developer must perform setting up the page could be avoided if the generator were enhanced. I also believe this additional work is a roadblock for adoption. As a result the general approach today is to use something like webrat and couple the cucumber steps directly to elements on the page. Let me try to explain a different approach.
I would like to see the current taza page generator (and other generators within taza) enhanced to generate the page elements. Generating the above page would be very much like generating a rails model:
The result of the above command would result in this class:
For the google search the developer would then have to go in and set the name values like the code in bold below.
Once the proceeding step was completed I would envision being able to use it in my test like this:
Please note that I am not proposing the exact usage api here. This is currently just an idea and as such there are many issues to be fleshed out. I expect the fleshing to take place during development.
Imagine a typical rails application where we have a page representing a user model with name, address, city, state, and zipcode. The page could look like this:
In our page class we could attempt to map the elements to items on the page with an id or name of “user_name”, “user_address”, etc. If we did not find user_name we could look for “name”. In many cases this would just work without any additional effort on the part of the developer. This follows the rails approach of convention over configuration.
Clearly this effort requires more than just changes to the generators. There would need to be significant changes made to the current taza library which I could see happening as part of the driver isolation effort.
Driver Isolation
Lets look at the google page object from the previous section:
Later when this is used it is accessed like this:
All of the code in bold is API from the driver - either selenium or watir. When you start building your objects with one driver you are stuck with it short of some major refactoring. It also keeps you from running your tests using both platforms if you so desire.
I believe taza should isolate the developer from the underlying driver much the same way that ActiveRecord provides isolation from different databases. This would allow developers to switch between drivers by changing the configuration yml files. A developer might want to do this if they determine that one driver works better with a specific browser while the other driver works better with yet another. There also might be cases where a driver adds support for a new browser type/version that is not available in the other.
The driver isolation would take the form of a thin veneer over both selenium and watir. The veneer would still allow developers to access the browser directly so they could use driver specific code where they deem necessary or on APIs that we do not yet provide in our wrapper. The goal of this effort would be to provide an API/DSL that would give developers the majority of the functionality they need to test web applications.
I first heard about taza from Joe O’Brien over breakfast one morning. He mentioned in passing that he was using it on a project. Since the gem was related to testing I had to take a look. At first it didn’t seem to fill a need I was having so I filed it away for later interrogation.
What do I need?
The company I work for (LeanDog) builds software and/or coaches companies hoping to learn how to become more agile or lean in there software development practices. I coach teams that develop software using J2EE and Ruby on Rails. It is not infrequent for my customers to have no test automation and often I am called upon to help setup the tools as well as train their developers and testers. As you might expect, I am very interested in automated testing.
I have standardized on using Cucumber for “acceptance testing” most web applications (both rails and J2EE) with JBehave being the exception on Java teams where they refuse to introduce Ruby. The tool works great for facilitating conversations between the customer and developers. Throughout numerous projects I have fine tuned my approach to using cucumber trying to maintain a balance between step granularity, good test design, and minimizing the need to refactor tests as the application grows and changes.
I have used both selenium and watir to drive the browser for our tests. Each gem has its’ strengths as well as weaknesses. We have learned over time that it is not a good idea to make calls to either API directly from our steps but rather to build up objects that represent our pages and encapsulate the details of the elements on the page (much like http://code.google.com/p/webdriver/wiki/PageObjects). These objects are tedious to write and once written they are bound to a driver (either selenium or watir).
In order to make things easier for me and my teams I decided I would write a new gem that would help alleviate the tedium of writing the page objects as well as isolate them from the driver. As I was working out the details of this new project I remembered taza. Taza has much of what I need but is lacking in a few areas.
Rails Support
Currently taza generates a stand-alone project from which you create your page objects and tests. If you plan to test a rails application I believe it would be more appropriate to generate taza directly into the rails application. This would require the development of a new generator. This new generator would generate the following:
- A site directory where the taza generated classes would reside
- A taza.yml file in the config directory that would contain what is currently in the config.yml and
.yml
These items would be generated directly into your rails application structure. Once taza is generated into your rails application it could be used by both cucumber and rspec tests. I would expect the classes that are generated inside of your rails application to be exactly the same as what is generated in a stand-alone project.
Element Generation
When you generate a page in taza you end up with a shell that looks like this:
module Google
  class HomePage < Taza::Page

  end
end
Next the developer must edit the generated class to add all of the elements from the html page. The google search page might look like this:
module Google
  class HomePage < Taza::Page
    element(:search_field) { browser.text_field(:name, 'q') }
    element(:search_button) { borwser.button(:name, 'btnG') }
  end
end
I believe there are two problems with this approach. The first is that the code written is directly coupled to the driver (I address this in more detail in the next section). The second problem is that all of the additional work a developer must perform setting up the page could be avoided if the generator were enhanced. I also believe this additional work is a roadblock for adoption. As a result the general approach today is to use something like webrat and couple the cucumber steps directly to elements on the page. Let me try to explain a different approach.
I would like to see the current taza page generator (and other generators within taza) enhanced to generate the page elements. Generating the above page would be very much like generating a rails model:
script/generate page search_field:text_field :search_button:button
The result of the above command would result in this class:
module Google
  class HomePage < Taza::Page
    text_field :search_field
    button :search_button
  end
end
For the google search the developer would then have to go in and set the name values like the code in bold below.
module Google
  class HomePage < Taza::Page
    text_field :search_field, :name => 'q'
    button :search_button, :name => 'btnG'
  end
end
Once the proceeding step was completed I would envision being able to use it in my test like this:
home_page.search_field = “Ruby”
home_page.press :search_button
Please note that I am not proposing the exact usage api here. This is currently just an idea and as such there are many issues to be fleshed out. I expect the fleshing to take place during development.
Imagine a typical rails application where we have a page representing a user model with name, address, city, state, and zipcode. The page could look like this:
module MyApp
  class UserPage < Taza::Page
    text_field :name
    text_field :address
    text_field :city
    selection :state
    text_field :zipcode
  end
end
In our page class we could attempt to map the elements to items on the page with an id or name of “user_name”, “user_address”, etc. If we did not find user_name we could look for “name”. In many cases this would just work without any additional effort on the part of the developer. This follows the rails approach of convention over configuration.
Clearly this effort requires more than just changes to the generators. There would need to be significant changes made to the current taza library which I could see happening as part of the driver isolation effort.
Driver Isolation
Lets look at the google page object from the previous section:
module Google
  class HomePage < Taza::Page
    element(:search_field) { browser.text_field(:name, ‘q’) }
    element(:search_button) { browser.button(:name, ‘btnG’) }
  end
end
Later when this is used it is accessed like this:
home_page.search_field.set ‘ruby’
All of the code in bold is API from the driver - either selenium or watir. When you start building your objects with one driver you are stuck with it short of some major refactoring. It also keeps you from running your tests using both platforms if you so desire.
I believe taza should isolate the developer from the underlying driver much the same way that ActiveRecord provides isolation from different databases. This would allow developers to switch between drivers by changing the configuration yml files. A developer might want to do this if they determine that one driver works better with a specific browser while the other driver works better with yet another. There also might be cases where a driver adds support for a new browser type/version that is not available in the other.
The driver isolation would take the form of a thin veneer over both selenium and watir. The veneer would still allow developers to access the browser directly so they could use driver specific code where they deem necessary or on APIs that we do not yet provide in our wrapper. The goal of this effort would be to provide an API/DSL that would give developers the majority of the functionality they need to test web applications.
Wednesday, July 1, 2009
Selenium Ruby
After using the selenium ruby gem for a while and seeing its' potential I decided to look deeper into the code. After cloning the project from github I quickly discovered it would not build locally. I also discovered that there had been no activity on the project for about five months. This was enough motivation for me to fork the project. I hope the OD is open to my pull requests but I guess that remains to be seen. If you want to check it out you can find it on github under cheezy.
Sunday, April 12, 2009
Getting Started with Groovy
After putting it off for a long while I decided it was finally time for me to learn Groovy. Chris Judd gave me a copy of his book Beginning Groovy and Grails when I saw him at Code Retreat 2 here in Cleveland on the boat. The fact that I will probably see him and Jim Shingler (a co-author for the book) at the CoJUG when I am in Columbus this Tuesday was enough motivation to get me rolling.

First of all I need to setup a development environment. Let me see... what are my choices?
- IntelliJ - very nice but I don't own a copy and re-installing the evaluation over and over again is not fun.
- Eclipse - it is free but the editor really sucks.
- TextMate - it has nice Groovy and Grails support but I am not real familiar with it.
- Emacs - my favorite editor of all time but I'll need to add Groovy support. I think I'll start here.
This mode provided basic language indentation and highlighting but not much else. I guess I will be enhancing it over the coming months. In order to pimp up my emacs for Groovy development I really needed to add a collection of yasnippets. I modified my yasnippet.el making it aware of my new groovy-mode and proceeded to add 62 snippets covering basic Groovy and Grails functionality. You can find all of this and my complete emacs configuration at my github emacs.d project. Now that I finally had a powerful development it was time to move on to the language.
Since I already have a lot of experience with Ruby and Java I thought it would be easy to pick up Groovy. My initial impression is that there are several things that feel weird - I guess I was expecting it to be more like ruby. I know I will have a lot to say about this over the coming weeks so please stay tuned.
Subscribe to:
Posts (Atom)